citty
https://unjs.io/packages/citty
Nitroとかh3とかいろいろいい感じのライブラリを作ってるUnJSのライブラリの一つ。いい感じにCLIツールを作れる。
準備
npm install citty公式のサンプルソースを拝借。
import { defineCommand, runMain } from "citty";
const main = defineCommand({ meta: { name: "hello", version: "1.0.0", description: "My Awesome CLI App", }, args: { name: { type: "positional", description: "Your name", required: true, }, friendly: { type: "boolean", description: "Use friendly greeting", }, }, run({ args }) { console.log(`${args.friendly ? "Hi" : "Greetings"} ${args.name}!`); },});
runMain(main);基本
以下、あえて間違った動かし方をしてみる。
node --experimental-strip-types index.ts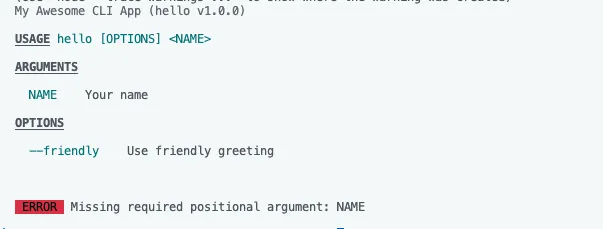
かなり親切に怒ってくれる。オプションなしで実行してみると…
node --experimental-strip-types index.ts Kanon![]()
オプションをつける。
node --experimental-strip-types index.ts Kanon --friendly trueフレンドリーになった。
![]()
argsのtypeについて
args: { name: { type: "positional", description: "Your name", required: true, }, friendly: { type: "boolean", description: "Use friendly greeting", }, },ここで試しにtypeにnumberを指定してみると怒られる。
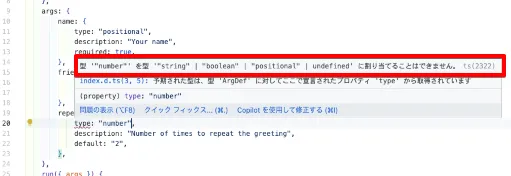
実装をみると以下のようになっている。
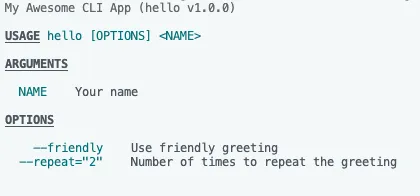
type ArgType = "boolean" | "string" | "positional" | undefined;どうやら4つを指定できるらしい。string, booleanはわかるがpositionalとはなにか。これは--helpで見てみるとわかる。まずは以下のように引数を定義して--helpする。
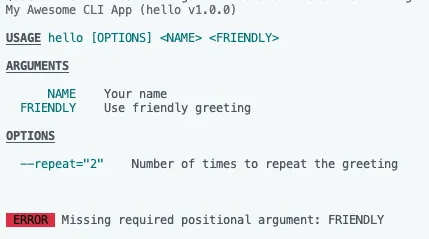
args: { name: { type: "positional", description: "Your name", required: true, }, friendly: { type: "boolean", description: "Use friendly greeting", }, repeat: { type: "string", description: "Number of times to repeat the greeting", default: "2", }, },helpもめっちゃわかりやすい。
では次に、friendlyをpositionalに変えてみる。
args: { name: { type: "positional", description: "Your name", required: true, }, friendly: { type: "boolean", type: "positional", description: "Use friendly greeting", }, repeat: { type: "string", description: "Number of times to repeat the greeting", default: "2", },},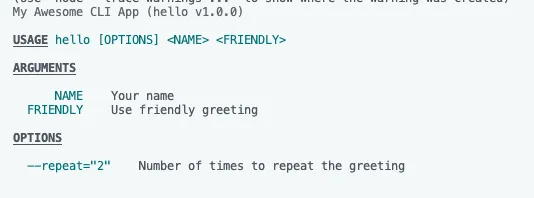
--friendlyからFRIENDLYに変わったのがわかるだろうか。つまり、「positionalはargsに指定された順番で受け取るよ」ということらしい。試しに以下のように実行してみると…
node --experimental-strip-types index.ts KanonFRIENDLYを指定しろと怒られた。
サブコマンド
サブコマンドを実装することもできる。以下のように二つのサブコマンドを実装してみる。
import { defineCommand, runMain } from "citty";
const greet = defineCommand({ meta: { name: "greet", description: "Greet someone", }, args: { name: { type: "positional", description: "Your name", required: true, }, friendly: { type: "boolean", description: "Use friendly greeting", }, }, run({ args }) { console.log(`${args.friendly ? "Hi" : "Greetings"} ${args.name}!`); },});
const byebye = defineCommand({ meta: { name: "byebye", description: "Goodbye someone", }, args: { name: { type: "positional", description: "Your name", required: true, }, }, run({ args }) { console.log(`byebye👋 ${args.name}!`); },});
const main = defineCommand({ meta: { name: "hello", version: "1.0.0", description: "My Awesome CLI App", }, subCommands: { greet, byebye, },});
runMain(main);ヘルプを見る。
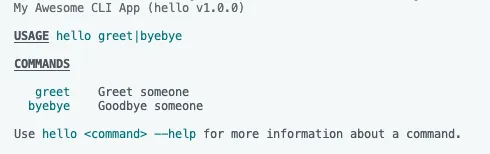
サブコマンドのヘルプを見るには--helpの後ろに続けるといいらしい。試しにbyebyeを見る。
node --experimental-strip-types index.ts --help byebye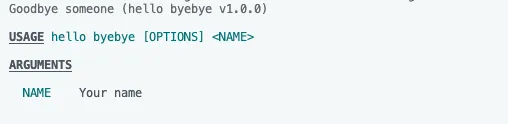
それぞれ実行してみる。
node --experimental-strip-types index.ts greet Kanon![]()
node --experimental-strip-types index.ts byebye Kanon![]()
setup, cleanup
setup, cleanupはrunの前後に実行する処理を定義することができる。引数にargsを指定すれば、そもそも履歴を取らなくなる。
setup({ args }){ console.log(`now setup ${args.command}`); }, cleanup({ args }){ console.log(`now cleanup ${args.command}`); },おわりに
お気づきの方もいらっしゃるだろうが、node --experimental-strip-typesをずっと使ってTSをそのままNodeで実行している。citty自体もめっちゃシンプルで便利だけど、--experimental-strip-typesがあることで一層いい感じ。
この記事は当初はてなブログで公開したものを個人ブログ開設にあたって移植したものです。